Recording a Lecture on PowerPoint in a few Simple Steps
Sometimes the easiest and most convenient way to transmit material asynchronously is to record the lecture on the presentation and to schedule the slides so that students can listen to you and watch the presentation at the same time. In this way, you can also use a marker that adds to the understanding of the material.
After recording, you will have a standard PPT presentation that can be played by displaying the slides – or you can save the presentation as a video file.
The above information works from a Microsoft website. You can find a more detailed explanation and appropriate videos here.
So let’s begin:
Recording Audio and Adding it to a Slide

Note: Your computer must have a microphone in order to record audio (most laptop computers have a microphone).
-
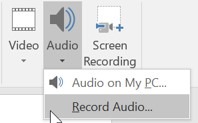
Select Add>Audio
-
Select Record Audio
-
Type a name for the audio clip, select Record

And then start speaking
-
In order to listen to the recording, select Stop

And then select Play ![]()
-
Select Record in order to record the clip again or select Confirm if you are satisfied with the recording.
-
In order to move the clip, select and drag the audio icon to the desired location on the slide.
So far we have learned how to record onto a PPT presentation.
The next step: How do you time slides while recording?

-
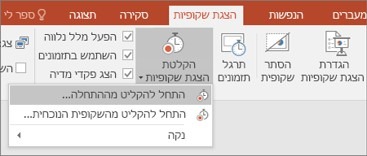
Click Slide Show >Record Slide Show
-
Please note: The Clear command deletes accompanying text or timings, so use it with care.

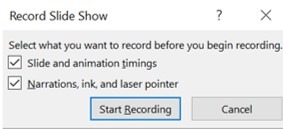
3. The slideshow opens in the Record window
4. Additional information about these options:
-
Slide and Animation Timings: PowerPoint automatically records the time you spend on each slide, including all animation steps that occur and the use of any trigger on each slide.
-
Accompanying text, ink and laser pointer: Record your voice as you play the presentation. Speak naturally, as you would speak during class. If you are using a pen, marker, eraser, or laser pointer, PowerPoint also records these actions for playing.

5. In the upper-right corner of the window there is the Recording toolbar that you can use to:
-
Move to the next slide

-
Pause recording

-
Re-record the current slide

If you re-record the text (including audio, ink, and laser pointer), PowerPoint will erase the previously recorded text ((including audio, ink, and laser pointer) when you start recording again on the same slide.
You can also re-record by going to Slide Show>Record Slide Show
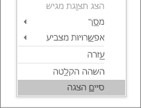
6. To finish recording, right-click the last slide and click Finish View.
Tip: When you are done recording the accompanying text, a sound icon will appear in the lower right corner of each slide that contains the accompanying text
The recorded slide show timings are automatically saved. The timings are displayed in a slideshow view under each slide.

In this process, what you record is embedded in each slide, and you can play the recording when displaying the slide show. A video file was not created by the recording process.
If you want to turn the presentation into a video file, you can save the presentation as a video with a few additional steps:
-
In the File menu, select Save to ensure that all of your recent additions are saved in PowerPoint (.pptx) presentation format.
-
Click File>Export>Create Video. Another option: on the Video tab on the tools strip, click Export Video.
-
In the first drop-down box under the Create Video heading, select the desired video quality, which pertains to the resolution of the finished video. The higher the video quality, the larger the file. (You may want to try out the options to see what suits you).
Because you recorded timed accompanying text, the default value is Use recorded accompanying text and timings.
-
Click Create Video.
-
In the file name box, enter a file name for the video, go to the folder that contains that file, and then click Save.
In the Save as type box, select MPEG-4 Video or Windows Media Video
You can track the process of the video creation by looking at the status bar at the bottom of the screen. The video creation process can take up to several hours depending on the length of the video and the complexity of the presentation.
-
To play the video that you just created, move to the folder’s destination location, and then double-click the file.
You can upload the presentation file with your recording or video file to your course site on Moodle.
Good luck!

